
Windows 2008 IIS Common Issue on MP : Make sure you need to meet this settings on your windows 2008 server
Windows 2008 IIS Common Issue on MP : Make sure you need to meet this settings on your windows 2008 server
Below are the basic exceptional for any antivirus for Microsoft products…
Windows:
KB822158 Virus scanning recommendations for Enterprise computers that are running currently supported versions of Windows
Windows / Active Directory:
http://support.microsoft.com/kb/822158
http://support.microsoft.com/kb/837932
http://support.microsoft.com/kb/943556
Cluster:
http://support.microsoft.com/kb/250355
Forefront: Considerations when using antivirus software on FF Edge
Products
http://support.microsoft.com/kb/943620
http://technet.microsoft.com/en-us/library/cc707727.aspx
FRS:
http://support.microsoft.com/kb/815263
SQL:
http://support.microsoft.com/kb/309422
IIS:
http://support.microsoft.com/kb/821749
http://support.microsoft.com/kb/817442
DHCP:
http://support.microsoft.com/kb/927059
SCOM / MOM:
http://support.microsoft.com/kb/975931
Hyper-V:
http://support.microsoft.com/default.aspx/kb/961804
Exchange:
Exchange 2010: http://technet.microsoft.com/en-us/library/bb332342.aspx
Exchange 2007: http://technet.microsoft.com/en-us/library/bb332342(EXCHG.80).aspx
http://support.microsoft.com/kb/328841
http://support.microsoft.com/kb/823166
http://support.microsoft.com/kb/245822
http://technet.microsoft.com/en-us/library/bb332342(EXCHG.80).aspx
http://technet.microsoft.com/en-us/library/bb332342.aspx
SharePoint:
http://support.microsoft.com/kb/952167
http://support.microsoft.com/kb/320111
http://support.microsoft.com/kb/322941
SMS:
http://support.microsoft.com/kb/327453
ISA:
http://support.microsoft.com/kb/887311
WSUS:
http://support.microsoft.com/kb/900638
SBS:
http://support.microsoft.com/kb/885685
Med-V
Recommended Anti-Virus exclusions for MED-V client and workspace installations
System Center:
Recommendations for antivirus exclusions in MOM 2005 and Operations Manager 2007
Ohh.. my systems dead slow after joins here… they given me T61 with 1 GB.. Where my system taking more than 1 Gb almost every time I am working my Page file….

I checked this utility, which has the most comprehensive knowledge of auto-starting locations of any startup monitor, shows you what programs are configured to run during system bootup or login, and shows you the entries in the order Windows processes them. These programs include ones in your startup folder, Run, RunOnce, and other Registry keys. You can configure Autoruns to show other locations, including Explorer shell extensions, toolbars, browser helper objects, Winlogon notifications, auto-start services, and much more. Autoruns goes way beyond the MSConfig utility bundled with Windows Me and XP.
Autoruns' Hide Signed Microsoft Entries option helps you to zoom in on third-party auto-starting images that have been added to your system and it has support for looking at the auto-starting images configured for other accounts configured on a system. Also included in the download package is a command-line equivalent that can output in CSV format, Autorunsc.
You'll probably be surprised at how many executables are launched automatically!
Here is the link to download http://live.sysinternals.com/autoruns.exe
There are 17 possible roles and 42 different features that can be enabled on Windows Server 2008 R2 Enterprise Edition.
Hyper-V role is not available for Windows Server 2008 R2 Itanium, Windows Server 2008 R2 Web, or Windows Server 2008 R2 Foundation.
Another problem in Windows Server 2008 Hyper-V was the inability to dynamically change the storage on a running VM. Unlike in the physical world where you can easily add or remove Universal Serial Bus (USB), eSATA, or iSCSI drives without shutting down a server, the only way to add or remove VHDs from a VM was to shut the VM down
Group policy was introduced with Windows 2000, and is an easy way of centralizing many Windows settings. In addition to centralizing event log and firewall settings, I personally like the ability to deploy MSI-based software applications with Group Policy, since it makes it extremely easy to deploy new software packages.
Even though Software Installation only works only with MSI-based packages, it does make deploying MSI-based software packages extremely easy.
We generally deploy software through Group Policy when three or more computers use it, since it's very easy to create a new package (if you already have a network share etc. setup, then you can literally do it in 2 minutes).
Before I list some of the useful WMI queries we use to target certain operating systems or computer types, there are a couple of things to note for those who are new to software deployment via group policy:

WMI Filtering
With this method, you can filter the computers which are affected by your policy, based on common properties of the Operating System. For example, some packages might distinguish between 32-bit and 64-bit, some packages might only work on Vista or later, whereas other packages apply only to servers. With WMI, you can target the right computers without having to mess with group memberships (though you will probably still need to do that). For example:
and then apply the respective WMI filter to them. But lets cut to the chase, here are a few WMI queries that you can cut & paste:
Operating System 32-bit
Select * from Win32_Processor where AddressWidth = '32'
Operating System 64-bit
Select * from Win32_Processor where AddressWidth = '64'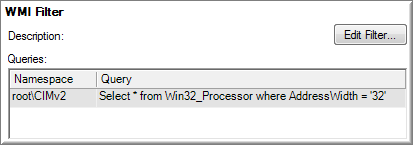
Workstation
Select * from WIN32_OperatingSystem where ProductType=1
Domain Controller
Select * from WIN32_OperatingSystem where ProductType=2
Server
Select * from WIN32_OperatingSystem where ProductType=3
Some filters require multiple WMI queries, which are just chained together.
Workstation 32-bit
Select * from WIN32_OperatingSystem where ProductType=1
Select * from Win32_Processor where AddressWidth = '32'
Workstation 64-bit
Select * from WIN32_OperatingSystem where ProductType=1
Select * from Win32_Processor where AddressWidth = '64'

Windows XP
Select * from WIN32_OperatingSystem where Version='5.1.2600' and ProductType=1
Windows Vista
Select * from WIN32_OperatingSystem where Version='6.0.6002' and ProductType=1
Windows 7
Select * from WIN32_OperatingSystem where Version='6.1.7600' and ProductType=1
Windows 2003
Select * from WIN32_OperatingSystem where Version='5.2.3790' and ProductType>1
Windows 2008
Select * from WIN32_OperatingSystem where Version='6.0.6002' and ProductType>1
Windows 2008 R2
Select * from WIN32_OperatingSystem where Version='6.1.7600' and ProductType>1
WIN32_OperatingSystem of course includes more information that can be useful for WMI queries, such as a descriptive name of the installed OS ("Name") as well as the service pack installed ("ServicePackMajorVersion").
Manufacturer (e.g. DELL)
Select * from WIN32_ComputerSystem where Manufacturer = 'DELL'
Installed Memory (e.g. more than 1Gb)
Select * from WIN32_ComputerSystem where TotalPhysicalMemory >= 1073741824
For more information, check out these resources on WMI:
WMI
Secrets of Windows Management Instrumentation
Scriptomatic (Vista/Win2k8/Win7: run as administrator!)
Active Directory Snapshot Tool (ADST)
ADST tools is the one like MBSA it checks everything about AD healthchecks.
Below are the complete tools for AD health checks
| Test |
| Frequency | |
| AD Convergence | Daily |
| DCDiag – General | Daily |
| FRS Convergence | Daily |
| Performance Info | Daily |
| Replication Status | Daily |
| Account Policies | Weekly |
| Backup Status | Weekly |
| Database Info | Weekly |
| DCDiag – DNS | Weekly |
| DNSLint | Weekly |
| DNS Information | Weekly |
| Event Logs | Weekly |
| Exchange DSAccess | Weekly |
| GPOTool | Weekly |
| IP Information | Weekly |
| Large Groups | Weekly |
| OS Information | Weekly |
| Replication Configuration | Weekly |
| Site Configuration | Weekly |
| Subnet Information | Weekly |
| SYSVOL Information | Weekly |
| Time Configuration | Weekly |
| WINS 1B and 1C | Weekly |
| AD Object Count | Monthly |
| Forest / Domain Information | Monthly |
| Machine Account Info | Monthly |
| Orphaned GPTs | Monthly |
| Partition ACLs | Monthly |
| Security Updates | Monthly |
| Unlinked GPOs | Monthly |
| User Account Info | Monthly |
| Account Lockouts | As needed |
| ADST Dependencies | As needed |
============================================================================================================================================
****************To rename the server Name
Default installations of Windows Server 2008 give the server a name like WIN-94CX1930EF21 or some other obscure pattern that doesn't fit into most computer infrastructures. You can change the computer name using the netdom command. Netdom (which isn't a new tool) is an easy way to change the computer name after Windows Server 2008 is installed on Core Editions. You can also use it on the full installation versions.
It's pretty straightforward to use the netdom command. For example, let's go from the default name WIN-94CX1930EF21 to a computer name of SERVER13. This is the command you would enter:
netdom renamecomputer WIN-94CX1930EF21 /Newname SERVER13
============================================================================================================================================
****************To Add the IP address
In Windows Server 2008 Core installation, the only way to setup IP Address eithe Static or DHCP is from the command line. The following procedure helps setting the IP Address from the command Line using "netsh". This procedure works in Windows Server 2008 (No core installation as well), Windows Server 2003, Windows XP, Windows Vista.
To setup Static IP Address:
From the command prompt:
1. Type
C:\Users\Administrator> netsh interface ipv4 show interfaces
Idx Met MTU State Name
- – — —- ——-
1 50 4294967295 connected Loopback Pseudo-Interface 1
10 20 1500 connected Local Area Connection
This should show the Network Connections. We are looking for the name here. On mine, I have one LAN interface and is named as "Local Area Connection"
2. To set a static IP Address type the following command
C:\Users\Administrator>netsh interface ipv4 set address name="Local Area Connect
ion" source=static address=192.168.0.5 mask=255.255.255.0 gateway=192.168.0.1
The syntax is
netsh interface ipv4 set address name="<ID>" source=static address=<StaticIP> mask=<SubnetMask> gateway=<DefaultGateway>
Where:
ID is the name of the LAN Connection
StaticIP is the static IP address that you are setting
SubnetMask is the subnet mask for the IP address
DefaultGateway is the default gateway
===========================================================================================================================================
****************TO set the DNS Servers :---
set the DNS Servers one at a time with the followind command. For each DNS server, increase the index number.
C:\Users\Administrator>netsh interface ipv4 add dnsserver name="Local Area Connection" address=192.168.0.1 index=1
C:\Users\Administrator>netsh interface ipv4 add dnsserver name="Local Area Conne
ction" address=192.168.0.10 index=2
The syntax is
netsh interface ipv4 add dnsserver name="<ID>" address=<DNSIP>index=1
Where:
ID is the name of the Network Connection
DNSIP is the IP address of your DNS server
This should do. To confirm, do an "ipconfig"
Ethernet adapter Local Area Connection:
Connection-specific DNS Suffix . :
Description . . . . . . . . . . . : Broadcom 440x 10/100 Integrated Controller
Physical Address. . . . . . . . . : 00-1D-09-D4-2C-8F
DHCP Enabled. . . . . . . . . . . : No
Autoconfiguration Enabled . . . . : Yes
IPv4 Address. . . . . . . . . . . : 192.168.0.5(Preferred)
Subnet Mask . . . . . . . . . . . : 255.255.255.0
Default Gateway . . . . . . . . . : 192.168.0.1
DNS Servers . . . . . . . . . . . : 192.168.0.1
192.168.0.10
127.0.0.1
NetBIOS over Tcpip. . . . . . . . : Enabled
============================================================================================================================================
****************TO ADD INTO DOMAIN.. cALLED MYDC.COM WITH THE COMPUTER NAME DHCPSRV
netdom join dhcpsrv /domain:mydc /userd:administrator /passwordd:*
or else you can use the below
netdom join dhcpsrv /domain:mydc
============================================================================================================================================
Microsoft has just released Windows Server 2003 SP2, currently available for all architectures (x86, x64, & Itanium) in English and German.
Download Links:
Windows Server 2003 SP2 for x86
Integrating the Service Pack
You can slipstream SP2 into your Windows Server 2003 CD by copying the contents of your CD to a folder on your hard-drive, and issuing the following command:
WindowsServer2003-KB914961-SP2-x86-ENU.exe /integrate:C:\W2k3\
In the example above, this is the x86 installer being used and the Windows Server 2003 CD has been copied to C:\W2k3\
After the process completes, download Microsoft Corporation.img and use it as the bootsector for your CD.
If you're using Nero, it'll look something like this:
Choose CD-ROM (Boot) from the New Compilation's Boot page.
Under Source of boot image data choose "Image file" and Browse to the Microsoft Corporation.img.
Select Enable expert settings (for advanced users only) and set the following: Kind of emulation - No Emulation
Number of loaded sectors - 4
Load segment of sectors - 07C0
Now that your machine has been more or less configured and is ready to be deployed, it's time to discuss how you go about preparing the server for installation in different scenarios. As you know from earlier in this book, Windows Server 2008 offers groups of services, and the associated software, wrapped in "roles" that correspond to the likely environments in which you will deploy a machine. On a full installation of Windows Server 2008, these roles are installed using the Server Manager MMC console. On a Server Core machine, that is obviously not possible, as the graphical shell largely doesn't exist.
There is a command-line utility called oclist that allows you to view available roles to install on a machine with Windows Server 2008 Server Core. Once you have run oclist and identified any given role name, you can use that name in conjunction with the ocsetup utility to install or uninstall that server role or optional feature.
Some sample output from oclist
Note that the DHCPServerCore role is listed as not installed. Let's say that we wanted our Server Core machine deployed as a headless, GUI-less, stripped-down DHCP server for our enterprise. To prepare the machine, we need to install the DHCP Server role. Using the name we obtained from the oclist command output, we can start the role installation process with the ocsetup command, as follows:
ocsetup DHCPServerCore
The system will trundle for a while, and the process should complete without errors. To verify that the role installation process is complete, run oclist again and then check to see whether the DHCPServerCore role is listed as "installed."
To uninstall a role, use the following command (in our case, should we want to uninstall the DHCP Server role):
ocsetup DHCPServerCore /uninstall
One role that you would likely want to install on a Server Core machine is the domain controller role. Installation of this role on a Server Core machine is a bit different, because installing the role using ocsetup has a large dependency on the graphical shell—meaning that using that method of setup can result in a very unstable Server Core machine that thinks it's a domain controller in some ways, but in other ways it doesn't.
The only supported way to install the domain controller role on a Server Core machine is to use the dcpromo utility in unattended mode. Using unattended mode requires setting up a simple text file with some parameters that will allow dcpromo to proceed without needing to prompt the user for any information, and ultimately you will be able to successfully promote a Server Core member server to a domain controller.
You need, at a minimum, the following nine parameters in a file called unattend.txt (or anything you want, as long as you remember the name):
[DCInstall] ReplicaOrNewDomain=Domain NewDomain=Forest NewDomainDNSName=hasselltech.local AutoConfigDNS=Yes DNSDelegation=Yes DNSDelegationUserName=username DNSDelegationPassword=password RebootOnSuccess=NoAndNoPromptEither SafeModeAdminPassword=breakincaseofemergency
|
Then, to run the utility, just issue the following command:
dcpromo /unattend:unattend.txt
Included with Windows Vista and full installations of Windows Server 2008 is the Windows Remote Shell, or WinRS. You'll also find WinRS on installations of Windows Server 2003 R2. WinRS consists of a listener portion that runs on the Server Core machine itself, and the client software on other machines. The client software sends commands addressed to specific machines to the listener port on that machine, and the WinRS software on the Server Core machine receives the command, executes, and transmits the output back to the originating client machine.
First, you'll need to activate the WinRS listener on the Server Core machine. Use the following command:
WinRM quickconfig
Once the listener is configured, you can simply go to any Windows Vista or Windows Server 2008 (full edition) machine, and funnel your Server Core-destined commands through winrs. For example, to see the results of the oclist command, issue the following at a command line on a Vista machine:
winrs -r:WS08-CORE-1 "oclist"
Many administrators find setting up Server Core machines with a consistent configuration can be achieved most easily through the use of a targeted Group Policy attack. You can create a group policy object (GPO) that only applies to Server Core machines by limiting the application of the GPO's attributes via WMI to only machines operating with the Server Core SKU, or by creating an organizational unit (OU) within Active Directory Domain Services, placing only Server Core machines within that OU, and then linking the GPO to the newly created OU. I prefer the WMI method, as it doesn't force you to construct your AD hierarchy based on operating systems, although both methods ultimately work equally as well in terms of the desired effect.
To use the WMI method, filter the OperatingSystemSKU property under the Win32_OperatingSystem class. The applicable values are as follow: 12 represents the Datacenter Server Core edition, 13 represents the Standard Server Core edition, and 14 represents the Enterprise Server Core edition.
-------------------
Thanks,
Paddy
Here are some other things you don't get with Windows Server 2008 Server Core:
No .NET Framework, or even the common language runtime (CLR)
No Microsoft Management Console, and no related snap-ins
The vast majority of Control Panel applets are not present
No Run box, and no Start menu to go with it
Modularity is the key word and was the ultimate design concept surrounding the complete redevelopment of the request processing pipeline in IIS 7.
There are 40 different modules that make up the feature set of IIS, divided into eight categories. These modules are individually listed here, so you can see how different modules make up the functional stack that is IIS 7.
StaticFileModule
DefaultDocumentModule
DirectoryListingModule
HttpRedirect
CustomErrorModule
Windows Process Activation Service
ProcessModel
NetFxEnvironment
ConfigurationAPI
Security
BasicAuthModule
DigestAuthModule
WindowsAuthModule
CertificateAuthModule
AnonymousAuthModule
IPSecurityModule
UrlAuthorizationModule
RequestFilteringModule
Health and Diagnostics
HttpLoggingModule
CustomLoggingModule
RequestMonitorModule
HTTPTracingModule
ODBCLogging
LoggingLibraries
Performance
HTTPStaticCompression
HTTPDynamicCompression
Management
ManagementConsole
ManagementScripting
ManagementService
Metabase
WMICompatibility
LegacyScripts
LegacySnap-in
Application Development
NetFxExtensibility
ISAPIModule
ISAPIFilterModule
CGIModule
ServerSideIncludeModule
ASP
FTP Publishing
FTPServer
FTPManagement
All installations of IIS 7 require a service new to Windows Server 2008, known as the Windows Process Activation Service, or WPAS. WPAS essentially maintains and administers all worker processes and application pools for IIS on any given machine, listening for new requests and either assigning them to existing processes or starting new work processes and marshalling the request to that process. WPAS also acts as a clearinghouse for configuration information for sites, application pools, and overarching web applications running on the machine.
Think back to the days of Windows NT 4.0, when there was one king of the hill, the primary domain controller (PDC), and then any number of subservient princes below that king on the same hill—the backup domain controllers, or BDCs. It was easy to see the flow of information—changes were made to the master copy of the domain security information on the PDC, and from there it flowed outward, unidirectionally, to the BDCs. When AD DS came around, however, this distinction was eliminated, and in practice a domain controller became equal to any other domain controller, without any designation of primary, backup, or so on. (Well, in actuality, some DCs are a little more equal than others when you factor operations master roles into the equation, but that's not relevant to this discussion.) While this new design increased the fault tolerance and distributed deployment capabilities of the operating system, it's somewhat of an issue if a domain controller anywhere on the network pushes corrupt or otherwise incorrect data to other DCs; how would you prevent that? In branch office scenarios, this issue is particularly serious, since the designated administrator in a branch office needs Domain Admin credentials to administer the DC in her office; this actually gives her the right to administer any DC, not just the one she's responsible for looking after. It's not the best security situation.
While this equality of domain controllers is still the case in Windows Server 2008's AD DS implementation, there is now the concept of a read-only domain controller. A read-only domain controller (RODC) is just that—it receives information replicated to it from full domain controllers, but it doesn't permit any changes to be made to its own copy of the directory database, and thus no information can be replicated back to the full DCs in the domain of which it's a member. This is a great win for branch offices whose companies are large enough to have a comprehensive AD DS structure. Now, you don't have to deploy a full-blown domain controller to your remote locations—you can simply place a RODC there. The benefits are significant and include the following:
You reduce the risk of someone attacking a branch office location and sending poisoned data throughout the entire AD DS database.
The RODC caches only the credentials of users and computers who have authenticated to the RODC and whom the Password Replication Policy allows to have credentials cached, which reduces the possibility that accounts can be cracked from a stolen branch office domain controller.
By default, the RODC does not cache domain administrator credentials, so the keys to the kingdom are more fully protected.
The Kerberos authentication tickets issued by the RODC will only be valid for systems within its scope, so it can't issue falsified tokens to get nefarious users onto the full network.
The RODC is a Server Core-designated role, which means there's hardly any need for administration locally. No GUI also means a smaller attack surface. To set up a read-only domain controller, run DCPROMO and select the option on the Additional Domain Controller Options screen to make your new domain controller a read-only domain controller.
During the Active Directory Domain Services Installation Wizard, when you're first deploying a RODC, DCPROMO recommends that you install a DNS server locally on the RODC. That server is fed zones from the AD DS infrastructure, and the process will add the RODC's local IP address to the RODC's local DNS client properties, so queries will be directed automatically to the AD-integrated zone on the machine itself.
However, for maximum fault tolerance, if there is only one DNS server and RODC (for instance, if the two services are running on the same machine) at a branch office, Microsoft recommends using the options in your DHCP scope—assuming you are using dynamic IP addresses at your branch office—to include not only the local RODC-based DNS server, but also a DNS server at the main office, where your other AD servers are centrally located. Make sure the local RODC-based DNS server is first on the list, so that only queries that fail to get a response from your local server are directed over the wire to your hub site.
If you have a larger branch office contingent, and you have multiple RODCs deployed at one branch office, you can install a DNS server instance on each RODC. Remember that since RODCs are indeed read-only, any dynamic update requests from your clients have to go directly to a writeable domain controller at your central office. The DNS server instances on RODCs will not attempt to replicate with one another; rather, they will receive all updates directly from the central AD DS infrastructure, so there may indeed be certain times wherein one local RODC has received an updated DNS entry for a client, but another has not. This issue resolves itself (no pun intended) within a replication cycle, but to avoid it, make sure the clients themselves have identical DNS server lists—use DHCP options to assist with this—and only install one DNS server instance per site.
In this section, I'll describe some useful programs designed to run from a command line that you can use to automate your DNS setup and configuration processes.
The Windows Server 2008 Support Tools collection, described earlier in the book, contains the DNSCmd utility, which is a great way to access some command DNS configuration-related functions through the power and speed of the command prompt. To get to DNSCmd, look in the Support\Tools directory on the Windows Server 2008 distribution CD for the file support.cab. Inside, copy and paste DNSCmd to a convenient location.
DNSCmd displays and changes the properties of DNS servers, zones, and resource records. Some operations of this tool work at the DNS server level while others work at the zone level. You can use DNSCmd on any Windows 2000 or XP computer, as long as the user that is running the application is a member in the Administrators or Server Operators group on the target computer. Both the user account and the server computer must be members of the same domain or reside within trusted domains.
DNSCmd can be used in any of the following situations, in which you want to:
Retrieve information about a DNS server
Begin the scavenging process
View information and contents of a DNS zone
Create, remove, or "pause" zones
Change the properties of a zone
Add, delete, and enumerate records in a zone
You use DNSCmd simply by specifying attributes and their values as part of a command. For example, to create a new standard primary zone called corp.hasselltech.local on a server named dc1.corp.hasselltech.local and stored in corp.hasselltech.local.dns files, use the following syntax:
dnscmd dc1.corp.hasselltech.local /ZoneAdd corp.hasselltech.local /Primary /file corp.hasselltech.local.dns
I could have also chosen to make corp.hasselltech.local a secondary zone by replacing the /Primary switch with /Secondary.
To create a new A record, I could issue the following command, which adds a record for a machine named www to the zone with an IP address of 192.168.1.23 to the same DNS server as in the previous example:
Dnscmd dc1.corp.hasselltech.local /RecordAdd corp.hasselltech.local www A 192.168.1.23
You can see all of the zones on a target server by entering the following command:
dnscmd dc1.corp.hasselltech.local /enumzones
If you're experiencing some problems with replication and want to trigger the process manually, you can start it with the following command (assuming you want to use the same server to begin the process as in the previous examples):
Dnscmd dc1.corp.hasselltech.local /ZoneRefresh corp.hasselltech.local
Likewise, you might find yourself needing to manually age all of the records on a particular machine. You can easily do so through DNSCmd using the following:
dnscmd corp.hasselltech.local /ageallrecords dc1.corp.hasselltech.local
You'll need to confirm your choice, and then the current time will be applied to all records on that machine.
You might also need to clear the DNS cache on a target server, which can be done using this command:
Dnscmd dc1.corp.hasselltech.local /clearcache
To quickly stop and start the DNS process on the target computer, use the following command:
Dnscmd dc1.corp.hasselltech.local /restart
If you want to export a particular zone to a file, you can issue the following command:
dnscmd /zoneexport corp.hasselltech.local corp.hasselltech.local.dns
And finally, to delete a zone from a target server, use the following command:
dnscmd dc1.corp.hasselltech.local /zonedelete corp.hasselltech.local
DNSLint is also on the distribution CD in support tools. DNSLint is a utility born out of the desire to automate the process of troubleshooting lame delegation issues and problems with AD replication because of faulty DNS records. DNSLint is a great tool to make sure that every DNS server that has records on your services has correct records and that there are no issues with those DNS servers' data. (And in case you're wondering, the name DNSLint comes from the idea that lint is something you find in your blue jeans after they come out of the dryer. When you find lint, it is useless and perhaps even embarrassing, meaning you probably quickly discard it. You should do the same with outdated or inaccurate DNS records for critical machines on your network.)
The best thing to do from the start is to create a standard report on any given DNS domain, using the following:
dnslint /d hasselltech.local /v
DNSLint produces an HTML-based report and then starts Internet Explorer to display the result. The results are color-coded with warnings in amber and errors in red for easy scanning. (You can elect to get a text-based report, if you prefer.) The report generated by the previous command will show a detailed listing of each DNS server for the corp.hasselltech.local domain and indicate whether the server responds to a query on port 53, which is the standard DNS port. It will tell you how it found each server, and it will also list each server that reports authoritatively. You will also see Mail Exchanger records in the zone, which is useful for troubleshooting SMTP routing problems.
If you are specifically having email difficulties, you can use DNSLint to determine whether a designated email server listens on the correct port. Use the following command:
dnslint /d domainname.tld /c
The report generated by that command lists whether a server indicated in an MX record is listening for SMTP, POP3, and IMAP4 requests, and will also show the SMTP header returned by the server to help in diagnostics.
To assist in troubleshooting, the following functions are available in DNSLint:
dnslint /d domainname
This diagnoses potential causes of "lame delegation," covered earlier in this chapter, and other related DNS problems. You'll receive an HTML-based report once the checking diagnosis is complete. Add /v for more information about how the DNS servers listed in the report were found. If you get errors saying that the domain specified is not listed with InterNIC, simply add the /s option.
dnslint /ql mylist.txt
This verifies a user-defined set of DNS records on multiple DNS servers. You can specify in a simple text file the sets of records you'd like to test. For example, the following tests A, PTR, CNAME, and MX records for the domain name and IP address of a fairly well-known company:
microsoft.com,a,r ;A record 207.46.197.100,ptr,r ;PTR record microsoft.com,cname,r ;CNAME record microsoft.com,mx,r ;MX record
dnslint /ad localhost
This verifies the DNS records on a specific host (in this case, the current machine) specifically used for Active Directory replication. If you get errors saying that the domain specified is not listed with InterNIC, simply add the /s option.
| |
In this section, I'll look at several ways you can manage file, print, and user services from the command line.
Sometimes it's inconvenient to use the Windows GUI to map a drive—this is a problem particularly in logon scripts. How do you use a batch file to tell the mouse pointer to move over to My Network Places? There's a better way. The net use command enables you to map any drive to any server on your network, and in some cases, outside networks, too. The syntax is:
net use drive \\server\share
Here are some common examples that you should find useful.
To map drive H: to Lisa Johnson's home directory on server MERCURY:
net use H: \\mercury\users\lmjohnson
To map the first available drive letter to the same directory:
net use * \\mercury\users\lmjohnson
Sometimes you might need to connect to a share on a domain that isn't trusted by your home domain. If you have an account on that domain, you can use it to connect, like so:
net use H: \\foreignmachine\sharename /user:foreigndomain\username
(If you need to use a password, you'll be prompted for it.)
If you need to terminate a connection or map to a server, use the /d switch:
net use \\mercury\users\lmjohnson /d
To disconnect all drive mappings on the local machinemaps:
net use * /d
To connect to a foreign machine (152.1.171.133, in this example) over the Internet or an intranet without relying on name resolution:
net use H: \\152.1.171.133\c$
You also can use a different account with the IP address:
net use H: \\152.1.171.133\c$ /user:hasselltech\hassell
And you can specify that this mapping is for the current session only and should not be restored upon logon. This is a feature that I call map persistency—keeping the same mappings across login sessions, a big timesaver for your users. To do so:
net use H: \\152.1.171.133\c$ /persistent:no
To set up default quotas and modify them using the command line, type the following at the prompt:
fsutil quota modify [VolumeOrDrive] [warninglevel] [hardquota] [username]
replacing the text in brackets with the appropriate information as specified in the following list:
VolumeOrDrive
The drive letter or volume name of the disk on which you want to modify a quota. Volume names are tricky to specify because you must do so using the globally unique identifier (GUID), which can be a long string of seemingly random numbers.
warninglevel
The amount of space at which warnings will be recorded in the system event log.
hardquota
The amount of space at which users will reach their maximum allowed disk space.
username
The user to which this quota specification applies.
Using fsutil.exe, you can create scripts to automatically set quota entries upon new-user creation to work around the limitation of assigning quotas to groups, as described earlier in this chapter. fsutil.exe can help you access functionality more quickly and efficiently than you can by using the GUI interface. The following examples, designed to run from a command line, illustrate the quota functionality available through fsutil.exe.
To disable quota support on drive C:
fsutil quota disable C:
To enable quota support on drive E:
fsutil quota enforce E:
To set a 250 MB quota for Lisa Johnson (user ID lmjohnson) on drive C:
fsutil quota modify C: 250000000 lmjohnson
To list the current quotas set on drive D:
fsutil quota query D:
To track the disk usage—in other words, to list which users are taking up what amount or portion of space—on drive F:
fsutil quota track F:
To list all users over quota on any volume on the server:
fsutil quota violations
To make a share's contents available offline from the command line, at a prompt, type:
net share nameofshare /CACHE:[manual | documents | programs | none]
/CACHE:manual enables manual client caching of programs and documents from this share. /CACHE: documents enables automatic caching of documents from this share. /CACHE:programs enables automatic caching of documents and programs (distinguished by their file extension) from this share. /CACHE:none disables caching from this share.
The GUI for managing shadow copies is somewhat complete; however, it lacks the ability to specify on which disk or volume shadow copies are stored. Also, an administrator cannot delete specific shadow copy files using the GUI. This might be needed if a user creates an incorrect version of a file, then leaves and another worker comes back the next day. An administrator might need to delete the previous version as soon as possible so that the new user doesn't inadvertently work from the incorrect version.
The vssadmin.exe command-line utility was created to offer administrators the ability to control these factors. I'll now walk through several examples.
vssadmin Add ShadowStorage /For=C: /On=D: /MaxSize=150MB
This command specifies that storage for shadow copies (known as an association) of drive C: will be stored on drive D:. If a value is not specified, there is no limit to the amount of space shadow copies can use. Shadow copies require at least 100 MB of space, and you can specify the maximum amount in KB, MB, GB, TB, PB, and EB, although it's assumed if you don't use a suffix, the value is in bytes.
vssadmin Create Shadow /For=E: /AutoRetry=2
This command creates a new shadow copy of drive E:. The /AutoRetry switch dictates that if another process is attempting to make shadow copies at the same time vssadmin is attempting to make them, the utility will keep trying for two minutes.
vssadmin Delete Shadows /For=C: /Oldest
This command deletes the oldest shadow copy on drive C:. You can use the /all switch to instead delete all shadow copies that can be deleted. You also can specify a specific shadow copy to delete by using /Shadow=ID, where ID is the hexadecimal number you obtain through the List Shadows command, covered later in this section.
vssadmin Delete ShadowStorage /For=C: /On=D:
This command deletes the storage space on drive D: that is used to store shadow copies of drive C:. If you leave off the /On switch, all shadow copy storage associations for drive C: will be deleted.
vssadmin Resize ShadowStorage /For=C: /On=D: /MaxSize=150MB
This command modifies the maximum size for a shadow copy storage association between drives C: and D:. Again, the maximum size has to be 100 MB or more. If you decrease the maximum size, older shadow copies can be deleted to make room for more recent shadow copies.
Other useful commands:
| |
The default special permissions are further described in the following list.
Traverse Folder/Execute File
Traverse Folder allows you to access a folder nested within a tree even if parent folders in that tree deny a user access to the contents of those folders. Execute File allows you to run a program.
List Folder/Read Data
List Folder allows you to see file and folder names within a folder. Read Data allows you to open and view a file.
Read Attributes
Allows you to view basic attributes of an object (read-only, system, archive, and hidden).
Allows you to view the extended attributes of an object—for example, summary, author, title, and so on for a Word document. These attributes will vary from program to program.
Create Files/Write Data
Create Files allows you to create new objects within a folder; Write Data allows you to overwrite an existing file (this does not allow you to add data to existing objects in the folder).
Create Folders/Append Data
Create Folders allows you to nest folders. Append Data allows you to add data to an existing file, but not delete data within that file (a function based on file size), or delete the file itself.
Write Attributes
Allows you to change the basic attributes of a file.
Write Extended Attributes
Allows you to change the extended attributes of a file.
Delete Subfolders and Files
Allows you to delete the contents of a folder regardless of whether any individual file or folder within the folder in question explicitly grants or denies the Delete permission.
Delete
Allows you to delete a single file or folder, but not other files or folders within it.
Read Permissions
Allows you to view NTFS permissions on an object, but not to change them.
Change Permissions
Allows you to both view and change NTFS permissions on an object.
Take Ownership
Allows you to take ownership of a file or folder, which inherently allows the ability to change permissions on an object. This is granted to administrator-level users by default.
You also can create custom combinations of permissions, known as special permissions, other than those defined in Windows Server 2008 by default; I cover that procedure in detail later in this section.
Windows Server 2008 special permissions | ||||||
| Special permission | R | W | RX | L | M | FC |
|---|---|---|---|---|---|---|
| Traverse Folder/Execute File | X | X | X | X | ||
| List Folder/Read Data | X | X | X | X | X | |
| Read Attributes | X | X | X | X | X | |
| Read Extended Attributes | X | X | X | X | X | |
| Create Files/Write Data | X | X | X | |||
| Create Folders/Append Data | X | X | X | |||
| Write Attributes | X | X | X | |||
| Write Extended Attributes | X | X | X | |||
| Delete Subfolders and Files | X | |||||
| Delete | X | X | ||||
| Read Permissions | X | X | X | X | X | |
| Change Permissions | X | |||||
| Take Ownership | X | |||||
| Full Control | X | X | X | X | X | X |